
Вирус your personal files are encrypted
Step By Step Measures To Remove .remk file virus
.remk file virus is another new and nasty ransomware infection which is created to cheat innocent PC users and is technically a new strain derived from STOP/DJVU ransomware family. This perilous malware infection can easily manage to alter system security and will get installed on machine without any prior notice. As a result, the malware easily manage to lock down all your important files and such affected data can easily be seen appended with a new file extension that appears as .remk. Therefore, such affected filles will surely turn to be inaccessible to users in real time, and every time they try access those, a text file based ransom note will appear on screen with name _readme.txt. This ransom note or text file is basically dropped by ransomware on desktop, and describes users with follow message:
So, the ransom message as mentioned above simply informs the victims that all their files are now encrypted by .remk file virus, and the sole possible measure to restore those files, is to purchase a valid decryption software/key from criminals who actually developed this ransomware. The price specified for the decryption tool is around 960 USD, however the victims are even promised to avail a 50 percent discount on ransom fee if they tend to contact hackers or criminals within next 72 hours of encryption. In such cases, the victims are asked to pay 480 USD through a prescribed Bitcoin wallet address. Further, the victims are also told to send the ransom fee remittance detail after the money is funded, through specified email ID, also the unique assigned ID and an encrypted file is asked to be sent to criminals through the mail.
Actually, the criminals require to confirm the payment first, after which they claim to provide users with the decryption software using which the files can be restored. However, the experts or security researchers never intend to support the criminals and suggests that the users should identify some other possible measures or guidelines to deal with the issues caused by this creepy ransomware strain. If your system also seems under impact of .remk file virus, we suggest you reading this article to learn how victims should tackle down the issue caused by this creepy ransomware.
Technical Specifications
Type: Ransomware, cryptovirus
Description: The malware term .remk file virus is completely a mischievous computer infection that encrypts files stored on computer using a strong encryption mechanism, and demands the victims to remit a specified ransom fee sooner, to seek their files restored.
Distribution: Malicious files embedded with payload dropper, spam/junk email attachments, and many more.
Removal (File Recovery): For detailed information about file’s recovery and removal of .remk file virus, get through the guidelines section included under this article
How .remk file virus intrudes on computer and how it should be treated?
.remk file virus is really a very notorious piece of ransomware and it mostly sneak on targeted computers through tactical methods. The malware mostly get carried through bundled freeware or shareware programs, spam/junk email attachments, suspicious websites, and through many other tricks as well. Once installed on targeted computer, the malware blocks installed security apps like antivirus and firewall settings. As a result, the malware manage to start its malignant activities easily which is followed by encryption of all files stored on computer, alteration of file extensions, deployment of ransom note on targeted computers, and eruption of ransom message on screen frequently. Therefore, if you want not to face off such hectic situations on your machine, you should simply avoid visiting porn sites, downloading malicious files or programs, using file sharing networks, using infected USB drives, and many more.
However, in case if your computer is currently infected by .remk file virus, then you might require to remove all its associated files, processes, and leftovers completely. However, proceeding with recommended removal steps will only be an ideal solution to overcome hectic issues caused by .remk file virus. If you are looking for suggested measures to resolve the issues, then you must have to follow some possible measures to clear .remk file virus along with all its associated elements. To perceive this taks, you can check and follow the guidelines here included. Once the removal of .remk file virus is processed, the victims can restore their files using a lately created backup file, or through some other file recovery measures as well, as described in this article later.
Special Offer (For Windows)
.remk file virus can be creepy computer infection that may regain its presence again and again as it keeps its files hidden on computers. To accomplish a hassle free removal of this malware, we suggest you take a try with a powerful Spyhunter antimalware scanner to check if the program can help you getting rid of this virus.
Do make sure to read SpyHunter’s EULA, Threat Assessment Criteria, and Privacy Policy. Spyhunter free scanner downloaded just scans and detect present threats from computers and can remove them as well once, however it requires you to wiat for next 48 hours. If you intend to remove detected therats instantly, then you will have to buy its licenses version that will activate the software fully.
Data Recovery Offer
We Suggest you to choose your lately created backup files in order to restore your encrypted files, however in case if you don’t have any such backups, you can try a data recovery tool to check if you can restore your lost data.
Step 1: Remove .remk file virus through “Safe Mode with Networking”
Step 2: Delete .remk file virus using “System Restore”
For Windows XP and Windows 7 users: Boot the PC in “Safe Mode”. Click on “Start” option and continuously press on F8 during the start process until the “Windows Advanced Option” menu appears on the screen. Choose “Safe Mode with Networking” from the list.
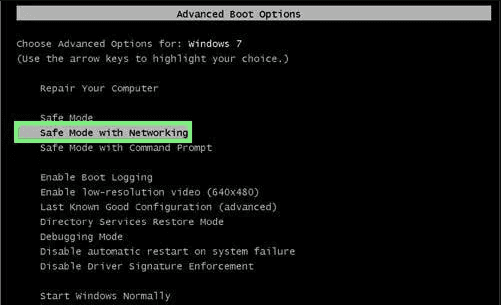
Now, a windows homescreen appears on the desktop and work-station is now working on “Safe mode with networking”.
For Windows 8 Users: Go to the “Start Screen”. In the search results select settings, type “Advanced”. In the “General PC Settings” option, choose “Advanced startup” option. Again, click on the “Restart Now” option. The work-station boots to “Advanced Startup Option Menu”. Press on “Troubleshoot” and then “Advanced options” button. In the “Advanced Option Screen”, press on “Startup Settings”. Again, click on “Restart” button. The work-station will now restart in to the “Startup Setting” screen. Next is to press F5 to boot in Safe Mode in Networking.
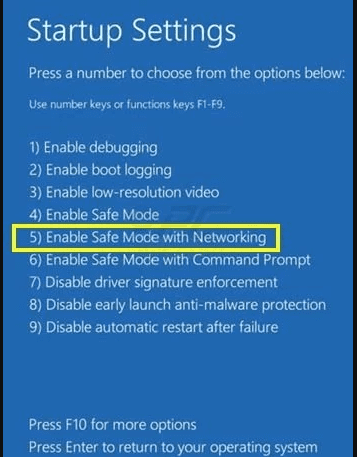
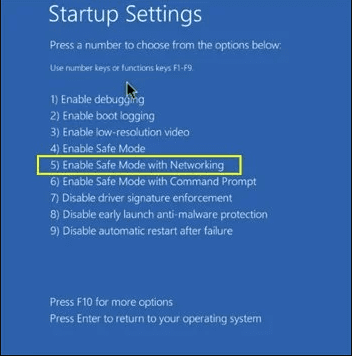
For Windows 10 Users: Press on Windows logo and on the “Power” icon. In the newly opened menu, choose “Restart” while continuously holding “Shift” button on the keyboard. In the new open “Choose an option” window, click on “Troubleshoot” and then on the “Advanced Options”. Select “Startup Settings” and press on “Restart”. In the next window, click on “F5” button on the key-board.
Log-in to the account infected with .remk file virus. Open the browser and download a legitimate anti-malware tool. Do a full System scanning. Remove all the malicious detected entries.
Special Offer (For Windows)
.remk file virus can be creepy computer infection that may regain its presence again and again as it keeps its files hidden on computers. To accomplish a hassle free removal of this malware, we suggest you take a try with a powerful Spyhunter antimalware scanner to check if the program can help you getting rid of this virus.
Do make sure to read SpyHunter’s EULA, Threat Assessment Criteria, and Privacy Policy. Spyhunter free scanner downloaded just scans and detect present threats from computers and can remove them as well once, however it requires you to wiat for next 48 hours. If you intend to remove detected therats instantly, then you will have to buy its licenses version that will activate the software fully.
Data Recovery Offer
We Suggest you to choose your lately created backup files in order to restore your encrypted files, however in case if you don’t have any such backups, you can try a data recovery tool to check if you can restore your lost data.
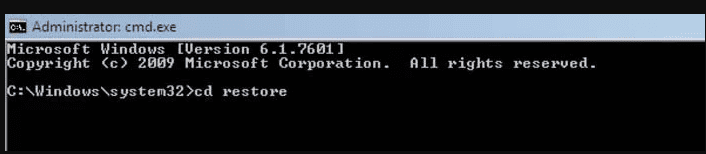
In case if you cannot start the PC in “Safe Mode with Networking”, Try using “System Restore”
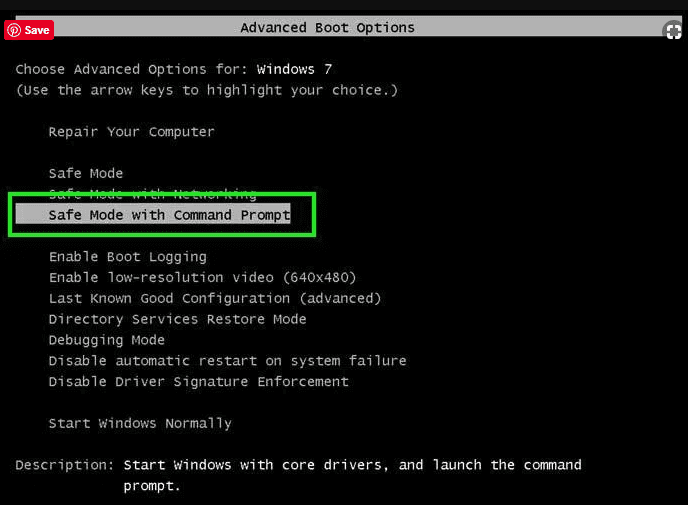
- During the “Startup”, continuously press on F8 key until the “Advanced Option” menu appears. From the list, choose “Safe Mode with Command Prompt” and then press “Enter”
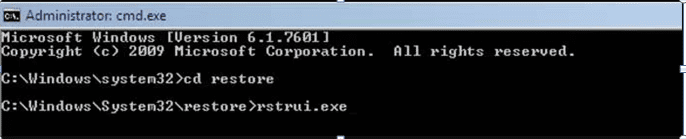
- In the new opened command prompt, enter “cd restore” and then press “Enter”.
- Type: rstrui.exe and Press “ENTER”
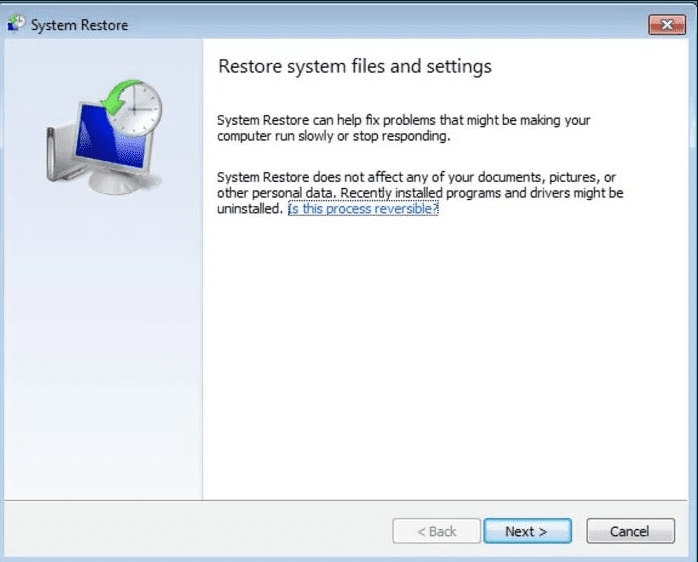
- Click “Next” on the new windows
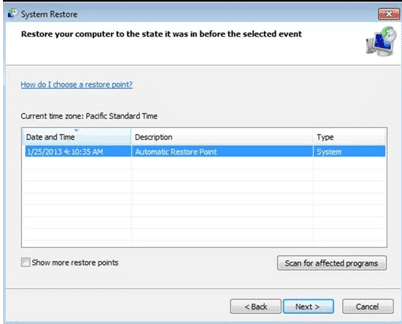
- Choose any of the “Restore Points” and click on “Next”. (This step will restore the work-station to its earlier time and date prior to .remk file virus infiltration in the PC.
- In the newly opened windows, press on “Yes”.
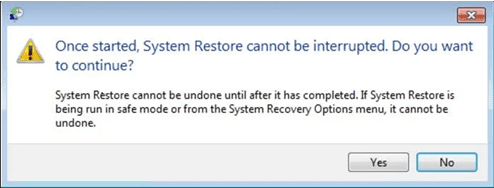
Once your PC gets restored to its previous date and time, download the recommended anti-malware tool and perform a deep scanning in order to remove .remk file virus files if they left in the work-station.
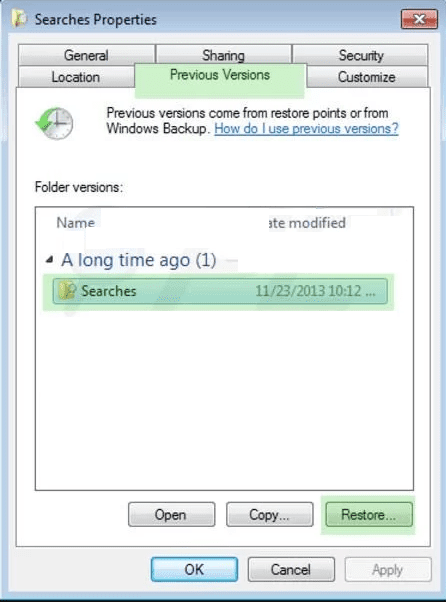
In order to restore the each (separate) file by this ransomware, use “Windows Previous Version” feature. This method is effective when “System Restore Function” is enabled in the work-station.
Important Note: Some variants of .remk file virus delete the “Shadow Volume Copies” as well hence this feature may not work all the time and is applicable for selective computers only.
In order to restore a single file, right click on it and go to “Properties”. Select “Previous Version” tab. Select a “Restore Point” and click on “Restore” option.
In order to access the files encrypted by .remk file virus, you can also try using “Shadow Explorer”. In order to get more information on this application, press here.
Important: Data Encryption Ransomware are highly dangerous and it is always better that you take precautions to avoid its attack on your work-station. It is advised to use a powerful anti-malware tool in order to get protection in real-time. With this help of “SpyHunter”, “group policy objects” are implanted in the registries in order to block harmful infections like .remk file virus.
Also, In Windows 10, you get a very unique feature called “Fall Creators Update” that offer “Controlled Folder Access” feature in order to block any kind of encryption to the files. With the help of this feature, any files stored in the locations such as “Documents”, “Pictures”, “Music”, “Videos”, “Favorites” and “Desktop” folders are safe by default.
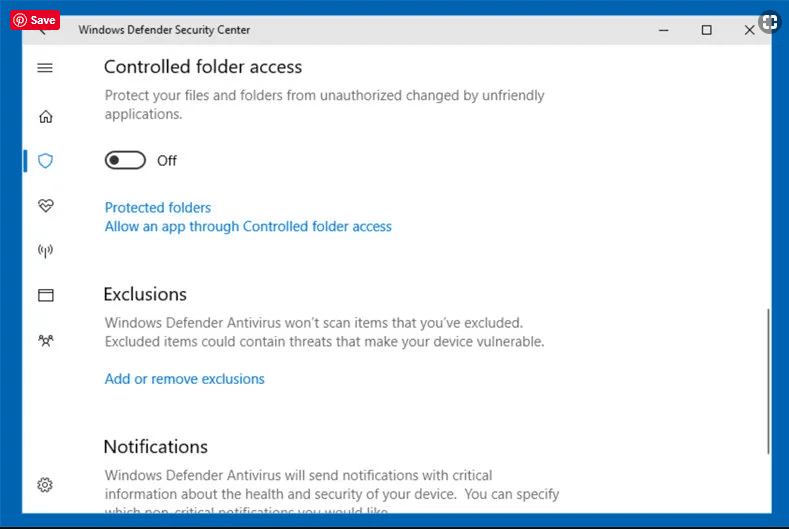
It is very important that you install this “Windows 10 Fall Creators Update” in your PC to protect your important files and data from ransomware encryption. The more information on how to get this update and add an additional protection form rnasomware attack has been discussed here.
Till now, you would have understood that what had happed to your personal files that got encrypted and how you can remove the scripts and payloads associated with .remk file virus in order to protect your personal files that has not been damaged or encrypted until now. In order to retrieve the locked files, the depth information related to “System Restore” and “Shadow Volume Copies” has already been discussed earlier. However, in case if you are still unable to access the encrypted files then you can try using a data recovery tool.
Use of Data Recovery Tool
This step is for all those victims who have already tries all the above mentioned process but didn’t find any solution. Also it is important that you are able to access the PC and can install any software. The data recovery tool works on the basis of System scanning and recovery algorithm. It searches the System partitions in order to locate the original files which were deleted, corrupted or damaged by the malware. Remember that you must not re-install the Windows OS otherwise the “previous” copies will get deleted permanently. You have to clean the work-station at first and remove .remk file virus infection. Leave the locked files as it is and follow the steps mentioned below.
Step1: Download the software in the work-station by clicking on the “Download” button below.

Step2: Execute the installer by clicking on downloaded files.
Step3: A license agreement page appears on the screen. Click on “Accept” to agree with its terms and use. Follow the on-screen instruction as mentioned and click on “Finish” button.

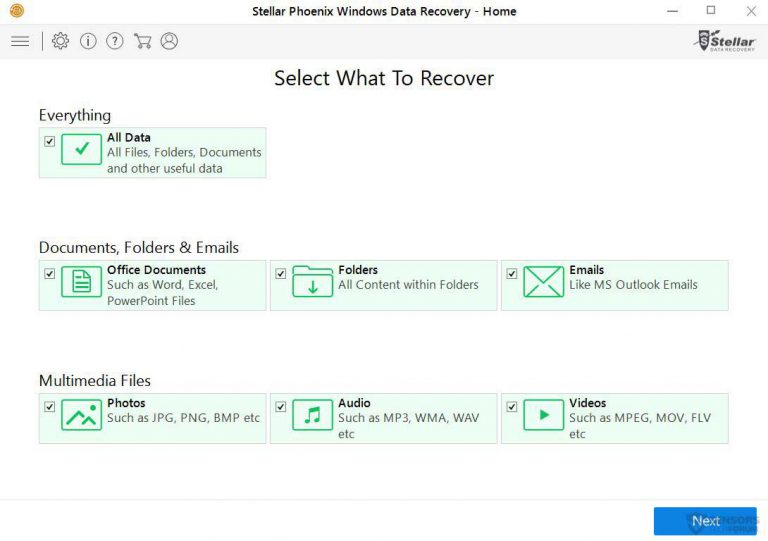
Step4: Once the installation gets completed, the program gets executed automatically. In the newly opened interface, select the file types that you want to recover and click on “Next”.
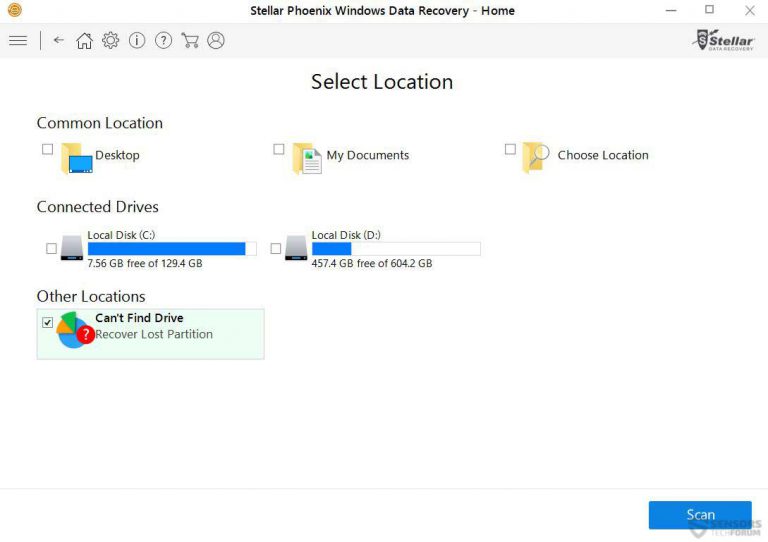
Step5: You can select the “Drives” on which you want the software to run and execute the recovery process. Next is to click on the “Scan” button.
Step6: Based on drive you select for scanning, the restore process begins. The whole process may take time depending on the volume of the selected drive and number of files. Once the process gets completed, a data explorer appears on the screen with preview of that data that is to be recovered. Select the files that you want to restore.

Step7. Next is to locate the location where you want to saver the recovered files.

Special Offer (For Windows)
.remk file virus can be creepy computer infection that may regain its presence again and again as it keeps its files hidden on computers. To accomplish a hassle free removal of this malware, we suggest you take a try with a powerful Spyhunter antimalware scanner to check if the program can help you getting rid of this virus.
Do make sure to read SpyHunter’s EULA, Threat Assessment Criteria, and Privacy Policy. Spyhunter free scanner downloaded just scans and detect present threats from computers and can remove them as well once, however it requires you to wiat for next 48 hours. If you intend to remove detected therats instantly, then you will have to buy its licenses version that will activate the software fully.
Data Recovery Offer
We Suggest you to choose your lately created backup files in order to restore your encrypted files, however in case if you don’t have any such backups, you can try a data recovery tool to check if you can restore your lost data.
Если ваши документы, фотографии и другие файлы перестали открываться, в конце их имени добавилось .purge, то ваш компьютер заражён вирусом шифровальщиком. При попадании на компьютер, эта вредоносная программа шифрует все персональные файлы, используя очень сильную гибридную систему шифрования AES + RSA. После того как файл зашифрован, его расширение изменяется на purge.
Как и ранее, цель вируса Purge заставить пользователей купить программу и ключ, необходимые для расшифровки собственных файлов. Вирус требует оплатить выкуп биткоинами. Если пользователь задержит перевод денег, то сумма может возрасти.
Вирус-шифровальщик обычно распространяется посредством электронной почты. Письмо содержит зараженные документы. Такие письма рассылаются по огромной базе адресов электронной почты. Авторы этого вируса используют вводящие в заблуждения заголовки и содержание писем, стараясь обманом заставить пользователя открыть вложенный в письмо документ. Часть писем сообщают о необходимости оплаты счёта, другие предлагают посмотреть свежий прайс-лист, третьи открыть весёлую фотографию и т.д. В любом случае, результатом открытия прикреплённого файла будет заражение компьютера вирусом-шифровальщиком.
Вирус-шифровальщик — это вредоносная программа, которая поражает современные версии операционных систем семейства Windows, такие как Windows XP, Windows Vista, Windows 7, Windows 8, Windows 10. Этот вирус использует гибридный режим шифрования AES + RSA, что практически исключает возможность подбора ключа для самостоятельной расшифровки файлов.
Во время заражения компьютера, вирус-шифровальщик Purge использует системные каталоги для хранения собственных файлов. Чтобы запускаться автоматически при каждом включении компьютера, шифровальщик создаёт запись в реестре Windows: разделах HKCU\Software\Microsoft\Windows\CurrentVersion\Run, HKCU\Software\Microsoft\Windows\CurrentVersion\RunOnce, HKCU\Software\Microsoft\Windows\CurrentVersion\Run, HKCU\Software\Microsoft\Windows\CurrentVersion\RunOnce.
Сразу после запуска вирус сканирует все доступные диски, включая сетевые и облачные хранилища, для определения файлов которые будут зашифрованы. Этот вымогатель использует расширение имени файла, как способ определения группы файлов, которые будут подвергнуты зашифровке. Могут быть зашифрованы практически все виды файлов, включая такие распространенные как:
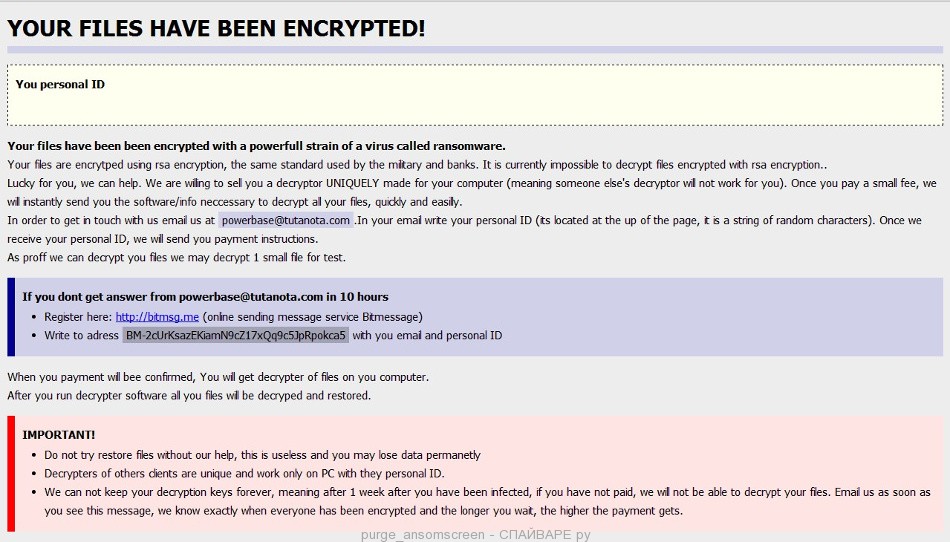
После того как файл зашифрован его расширение изменяется на .purge. Затем вирус создаёт файлы с именем How to restore files.hta. Этот файл содержит инструкцию по расшифровке зашифрованных файлов. Пример такой инструкции:
YOUR FILES HAVE BEEN ENCRYPTED!
You personal ID
—
Your files have been been encrypted with a powerfull strain of a virus called ransomware.
Your files are encrytped using rsa encryption, the same standard used by the military and banks. It is currently impossible to decrypt files encrypted with rsa encryption..
Lucky for you, we can help. We are willing to sell you a decryptor UNIQUELY made for your computer (meaning someone else’s decryptor will not work for you). Once you pay a small fee, we will instantly send you the software/info neccessary to decrypt all your files, quickly and easilly.
In order to get in touch with us email us at powerbase@tutanota.com.In your email write your personal ID (its located at the up of the page, it is a string of random characters). Once we receive your personal ID, we will send you payment instructions.
As proff we can decrypt you files we may decrypt 1 small file for test.
When you payment will bee confirmed, You will get decrypter of files on you computer.
After you run decrypter software all you files will be decryped and restored.
IMPORTANT!
Do not try restore files without our help, this is useless and you may lose data permanetly
Decrypters of others clients are unique and work only on PC with they personal ID.
We can not keep your decryption keys forever, meaning after 1 week after you have been infected, if you have not paid, we will not be able to decrypt your files. Email us as soon as you see this message, we know exactly when everyone has been encrypted and the longer you wait, the higher the payment gets.
Вирус-шифровальщик Purge активно использует тактику запугивания, давая жертве краткое описание алгоритма шифрования и показывая угрожающее сообщение на Рабочем столе. Он пытается таким образом заставить пользователя зараженного компьютера, не раздумывая, оплатить выкуп, для попытки вернуть свои файлы.
Определить заражён компьютер или нет вирусом Purge довольно легко. Обратите внимание на то, что все ваши персональные файлы, таких как документы, фотографии, музыка и т.д. нормально открываются в соответствующих программах. Если, например при открытии документа, Word сообщает, что файл неизвестного типа, то вероятнее всего документ зашифрован, а компьютер заражён. Конечно же, наличие на Рабочем столе сообщения о зашифровке всех файлов или появление на диске файлов с именем How to restore files.hta и инструкцией по-расшифровке, так же является признаком заражения.
Если вы подозреваете, что открыли письмо зараженное вирусом вымогателем, но симптомов заражения пока нет, то не выключайте и не перезагружайте компьютер. Первым делом отключите Интернет! После чего выполните шаги описанные в этой инструкции, раздел Как удалить Вирус-шифровальщик Purge. Другой вариант, выключить компьютер, вытащить жёсткий диск и проверить его на другом компьютере.
Если эта беда случилась, то не нужно паниковать! Но нужно знать, что бесплатного расшифровщика нет. Виной этому, стойкие алгоритмы шифрования, используемые этим вирусом. Это значит без личного ключа расшифровать файлы практически невозможно. Использовать метод подбора ключа так же не выход, из-за большой длины ключа. Поэтому, к сожалению, только оплата авторам вируса всей запрошенной суммы — единственный способ попытаться получить ключ расшифровки.
Конечно, нет абсолютно никакой гарантии, что после оплаты авторы вируса выйдут на связь и предоставят ключ необходимый для расшифровки ваших файлы. Кроме этого нужно понимать, что платя деньги разработчикам вирусов, вы сами подталкиваете их на создание новых вирусов.
Перед тем как приступить к этому, вам необходимо знать, что приступая к удалению вируса и попытке самостоятельного восстановления файлов, вы блокируете возможность расшифровать файлы заплатив авторам вируса запрошенную ими сумму.
Kaspersky Virus Removal Tool и Malwarebytes Anti-malware могут обнаруживать разные типы активных вирусов-шифровальщиков и легко удалят их с компьютера, НО они не могут восстановить зашифрованные файлы.
Скачайте программу Kaspersky Virus Removal Tool. После окончания загрузки запустите скачанный файл.
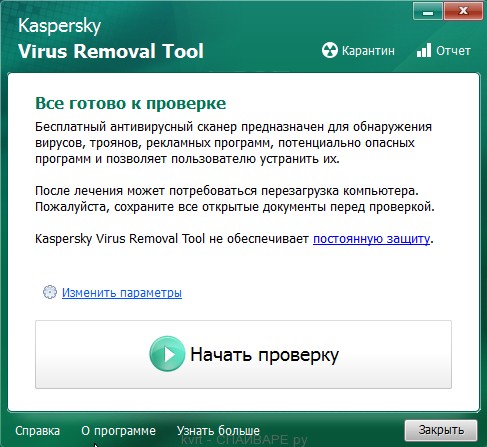
Кликните по кнопке Начать проверку для запуска сканирования вашего компьютера на наличие вируса-шифровальщика.
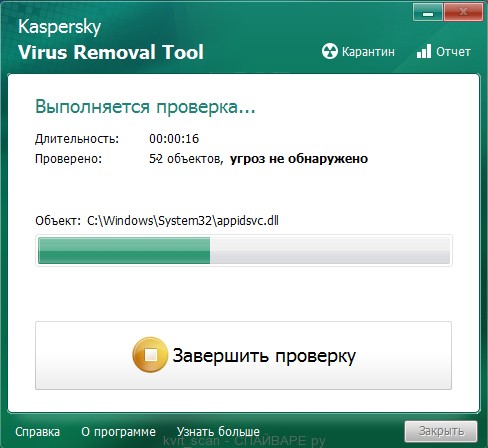
Дождитесь окончания этого процесса и удалите найденных зловредов.
Скачайте программу Malwarebytes Anti-malware. После окончания загрузки запустите скачанный файл.
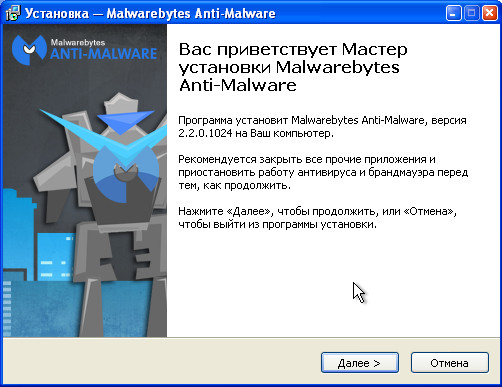
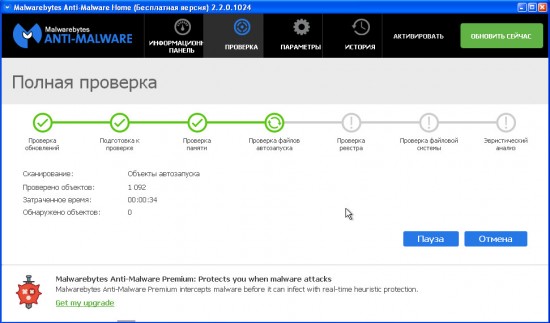
Кликните по кнопке Далее и следуйте указаниям программы. После окончания установки вы увидите основной экран программы.
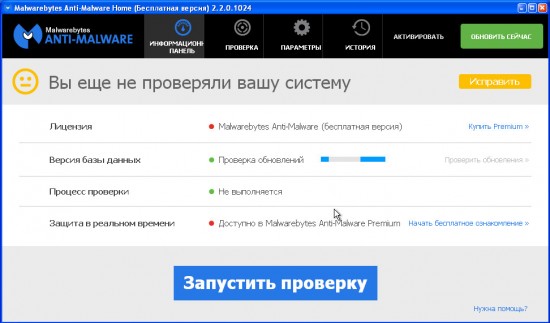
Автоматически запуститься процедура обновления программы. Когда она закончиться нажмите кнопку Запустить проверку. Malwarebytes Anti-malware начнёт проверку вашего компьютера.
Сразу после окончания проверки компьютера программа Malwarebytes Anti-malware откроет список найденных компонентов вируса-шифровальщика.
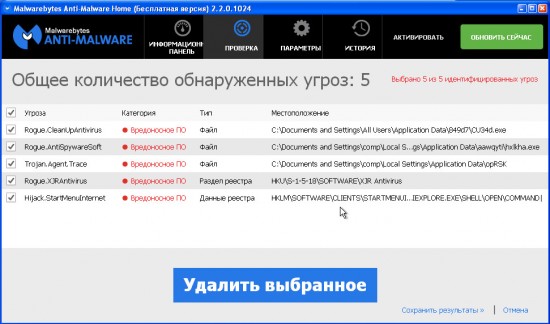
Кликните по кнопке Удалить выбранное для очистки вашего компьютера. Во время удаления вредоносных программ, Malwarebytes Anti-malware может потребовать перезагрузить компьютер для продолжения процесса. Подтвердите это, выбрав Да.
После того как компьютер запуститься снова, Malwarebytes Anti-malware автоматически продолжит процесс лечения.
В некоторых случая можно восстановить файлы зашифрованные вирусом-шифровальщиком . Попробуйте оба метода.
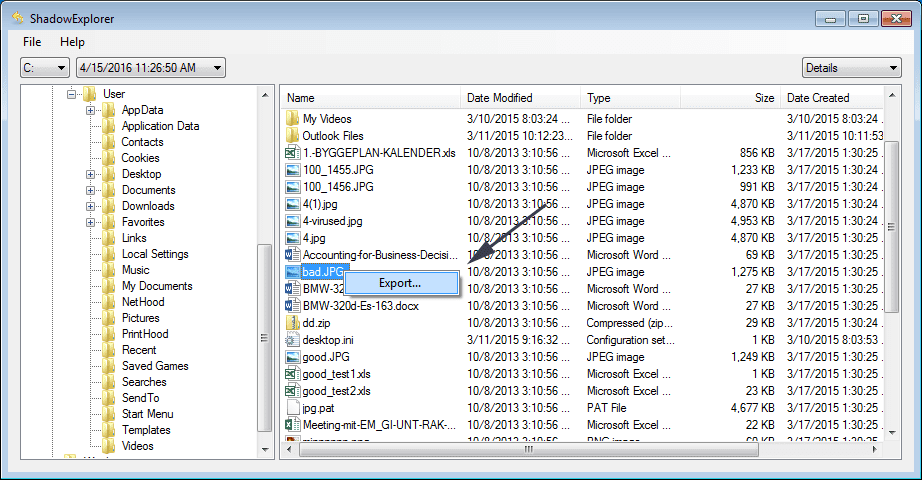
ShadowExplorer — это небольшая утилита позволяющая восстанавливать теневые копии файлов, которые создаются автоматически операционной системой Windows (7-10). Это позволит вам восстановить исходное состояние зашифрованных файлов.
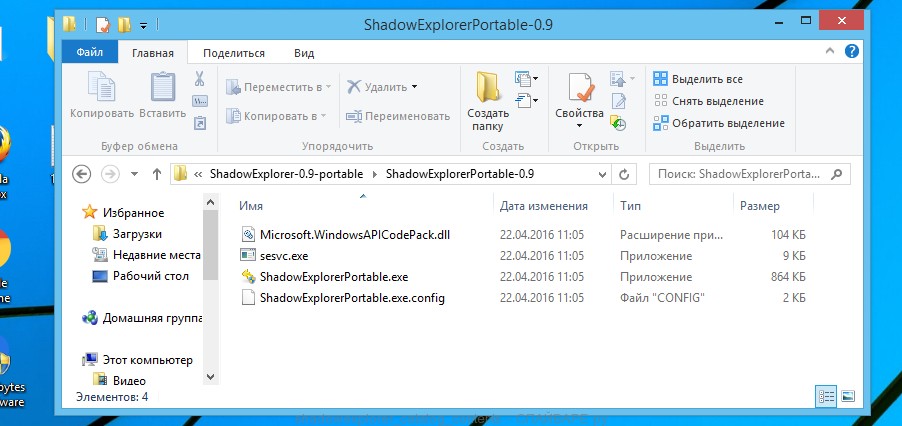
Скачайте программу ShadowExplorer. Программа находиться в zip архиве. Поэтому кликните по скачанному файлу правой клавишей и выберите пункт Извлечь все. Затем откройте папку ShadowExplorerPortable.
Запустите ShadowExplorer. Выберите нужный вам диск и дату создания теневых копий, соответственно цифра 1 и 2 на рисунке ниже.
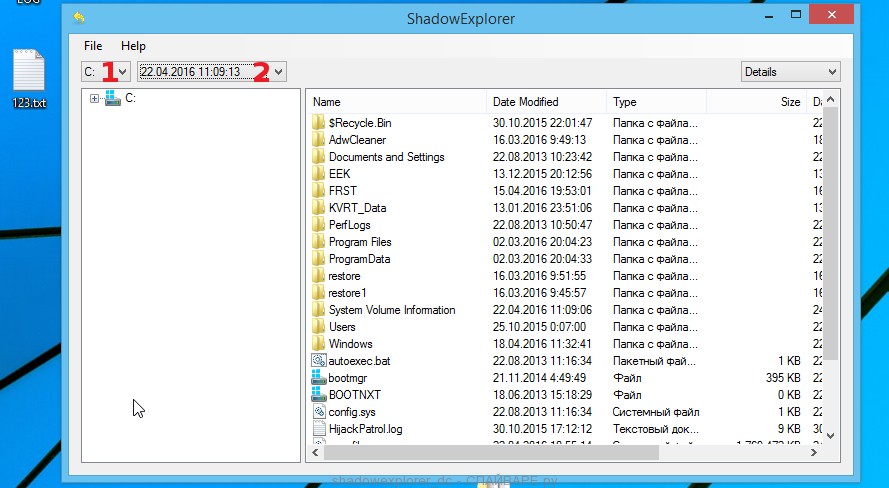
Кликните правой клавишей мыши по каталогу или файлу, копию которого вы хотите восстановить. В появившемся меню выберите Export.
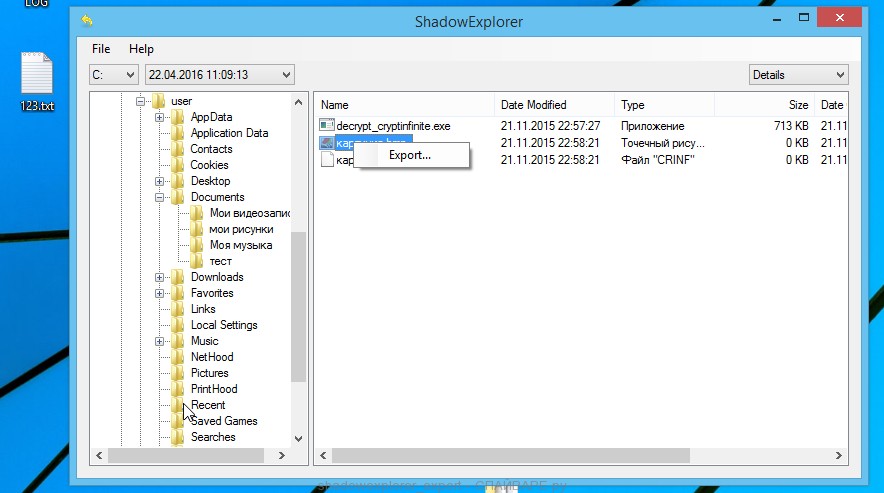
И последнее, выберите папку в которую будет скопирован восстановленный файл.
PhotoRec это бесплатная программа, созданная для восстановления удалённых и потерянных файлов. Используя её, можно восстановить исходные файлы, которые вирусы-шифровальщики удалили после создания их зашифрованных копий.
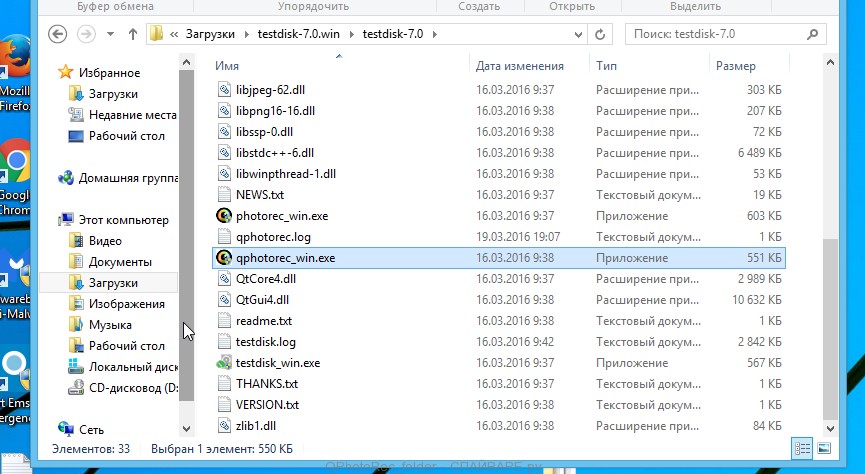
Скачайте программу PhotoRec. Программа находиться в архиве. Поэтому кликните по скачанному файлу правой клавишей и выберите пункт Извлечь все. Затем откройте папку testdisk.
В списке файлов найдите QPhotoRec_Win и запустите её. Откроется окно программы в котором будут показаны все разделы доступных дисков.
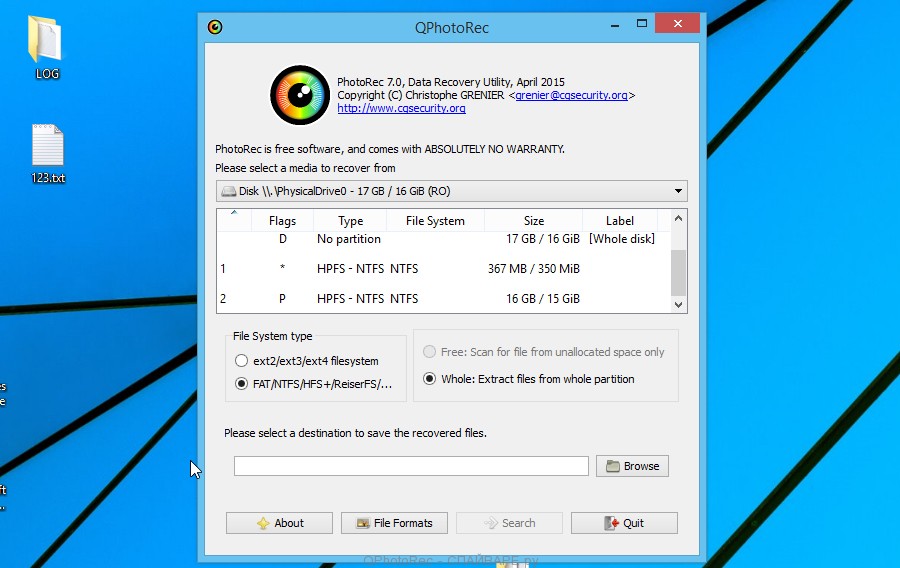
В списке разделов выберите тот, на котором находятся зашифрованные файлы. После чего кликните по кнопке File Formats.
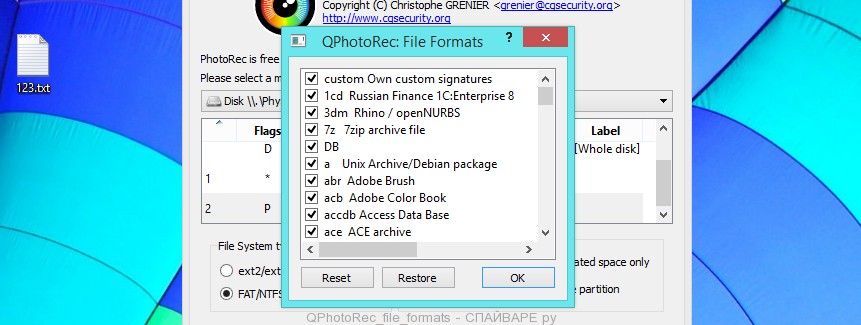
По-умолчанию программа настроена на восстановление всех типов файлов, но для ускорения работы рекомендуется оставить только типы файлов, которые вам нужно восстановить. Завершив выбор нажмите кнопку OK.
В нижней части окна программы QPhotoRec найдите кнопку Browse и нажмите её. Вам нужно выбрать каталог в который будут сохранены восстановленные файлы. Желательно использовать диск на котором не находятся зашифрованные файлы требующие восстановления (можете использовать флешку или внешний диск).
Для запуска процедуры поиска и восстановления исходных копий зашифрованных файлов нажмите кнопку Search. Этот процесс длится довольно долго, так что наберитесь терпения.
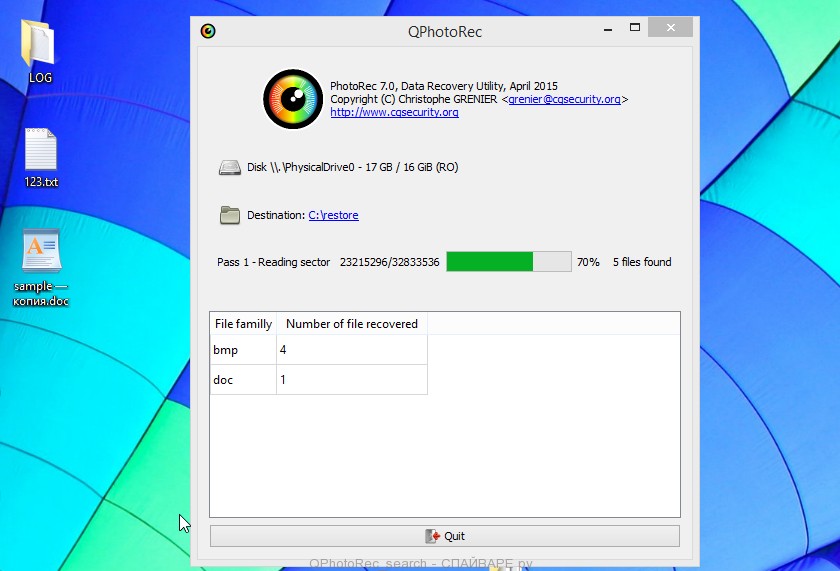
Когда поиск будет окончен, нажмите кнопку Quit. Теперь откройте папку, которую вы выбрали для сохранения восстановленных файлов.
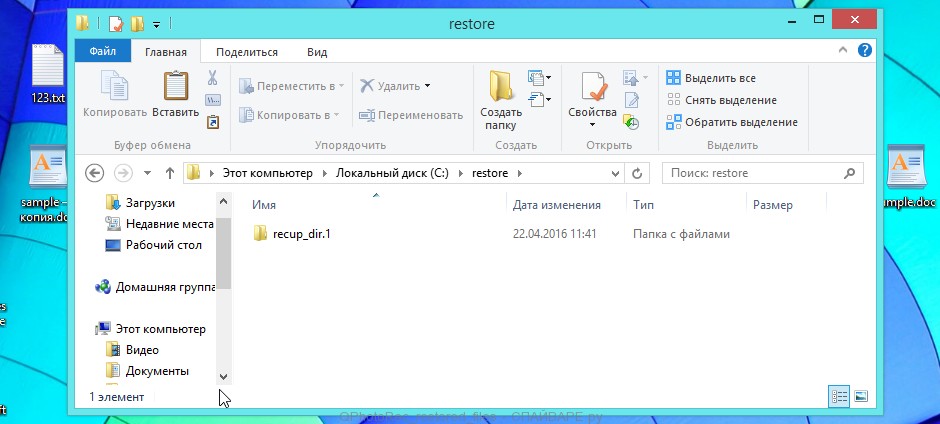
В папке будут находиться каталоги с именами recup_dir.1, recup_dir.2, recup_dir.3 и тд. Чем больше файлов найдет программа, тем больше будет и каталогов. Для поиска нужных вам файлов, последовательно проверьте все каталоги. Для облегчения поиска нужного вам файла, среди большого количества восстановленных, используйте встроенную систему поиска Windows (по содержимому файла), а так же не забывайте о функции сортировки файлов в каталогах. В качестве параметра сортировки можно выбрать дату изменения файла, так как QPhotoRec при восстановлении файла пытается восстановить это свойство.
Большинство современных антивирусных программ уже имеют встроенную систему защиты от проникновения и активизации вирусов-шифровальщиков. Поэтому если на вашем компьютере нет антивирусной программы, то обязательно её установите. Как её выбрать можете узнать прочитав эту статью.
Более того, существуют и специализированные защитные программы. Например это CryptoPrevent.
Скачайте CryptoPrevent и запустите. Следуйте указаниям мастера установки. Когда инсталлирование программы завершиться, вам будет показано окно выбора уровня защиты, как показано на следующем примере.

Нажмите кнопку Apply для активации защиты. Подробнее о программе CryptoPrevent и как её использовать, вы можете узнать в этом обзоре, ссылка на который приведена ниже.
Выполнив эту инструкцию ваш компьютер будет очищен от вируса-шифровальщика Purge. Если у вас появились вопросы или вам необходима помощь, то обращайтесь на наш форум.
Моё имя Валерий. Я сертифицированный специалист в области компьютерной безопасности, выявления источников угроз в ИТ инфраструктуре и анализе рисков с опытом работы более 15 лет. Рад поделиться с вами своими знаниями и опытом.
Оставить комментарий Отменить ввод комментария
Добро пожаловать
На нашем сайте размещены инструкции и программы, которые помогут вам абсолютно бесплатно и самостоятельно удалить навязчивую рекламу, вирусы и трояны.
Читайте также:
